
Windows Terminal Context Menu - How To Setup

When I heard about The new Windows Terminal I was mind Blown because of how beautiful it is to customize your own terminal window.

Terminals are one tool most programmers use to automatically generate something or build something. So having this kind of terminal is awesome.

After Downloading the terminal there is something missing. And that is opening the Windows Terminal in the context menu.

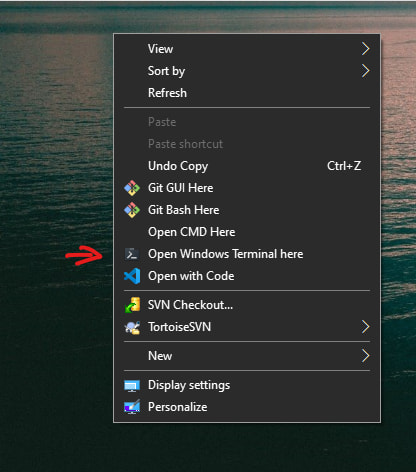
What A context menu is when you right-click on a directory and an option will show up. Something like this image. This is really a good feature to have because you can just easily open your project by doing it.

And so because of that, I created a simple PROJECT that is easy and simple to setup.

So, to set up this,

Important

You should have installed the Windows Terminal on your system. If you haven't installed yet, you can go to these options to download the app:


👉 Note: Windows Terminal requires Windows 10 1903 (build 18362) or later

Download the latest release HERE

Follow This Steps After Downloading, and will configure everything for you.

Step 1

Open Windows Terminal and Open settings. use Command Ctrl+, or by clicking the drop-down menu.

and then under profile -> default: add startingDirectory

"profiles": {
     "defaults" : {
          ...
          "startingDirectory": "." //add this
     }
}


Step 2

Run the Install.bat to automatically configure the context menu for you.

Thats It! Have a Nise Day! 😄👍👊

Project Repo 👈👈👍

Comments

Popular posts from this blog

JavaScript Best Practices: Tips & Tricks to Level Up Your Code

Learning new things everyday is part of what makes being a rational human being great. And as developers, it is part of our job to learn new things continuously, whether or not these things are from positive learning experiences. In this tutorial, I will point out a few important JavaScript best practices so you don’t have to learn it the hard way. Get ready to level to your code! 1. Avoid polluting the global scope Declaring variables is a lot of fun. Sometimes, you may declare global variables even if you don’t want to. In today’s browsers, the global variables are stored in the window object. So, since there’s a lot of stuff going on there, you may override default values. Let’s suppose you have an HTML file which contains a <script> tag containing (or which loads a JavaScript file containing): var foo = 42 ; console . log ( foo ) ; This will obviously output 42 in the console. But since the code is not executed in a function, the context will be the glob

Create and Deploy Website in just a SECOND

Hi im a web dev here. Because of Covid19 most of us moved from office based to Work From Home environment. So during this time, I was able to use my free time in creating a website. This is my website that I created using domain in freenom . jenuelganawed.ml Step 1 Create your app. Go ahead and create you webapp/site. You can use nodejs, VueJs, AngularJs, React Js, or maybe pure html,css, and js. Step 2 Build Your App (optional) remove the directory where the build files are created in .gitignore file. Step 3 Add it as a new Repository in your account. Create a new repository, and push your files inside it. Step 4 Add it in Netlify Open Netlify , if you don’t have an account then create one. Then you can now add it in netlify with the option ‘New Site From Git’ and set it up. Step 5 Create you own domain name For me, since I want to test the website I created a free domain in freenom. And then use it to your netlify website in the domain setting option. I did not c